---
title: "Troubleshooting Tecan EVOware Worktable: Resolving Vanished Labware"
description: Did a plate vanish from your Tecan EVOware workspace layout? Fix this Freedom EVO 200 error quickly by resetting your accidental carrier site Y-offset.
image: https://blog.seqgen.com/hubfs/tecan-worktable-troublehooting.gif
---
- [MARKETPLACE](https://seqgen.com/marketplace/)
- [CAREERS](https://seqgen.com/careers/)
- [TERMS & CONDITIONS](https://seqgen.com/wp-content/uploads/2026/03/POL_011-Rev.A_Terms-and-Conditions-of-Sales-for-Products-and-Services.pdf)
- [ISO 9001 CERTIFICATE](https://seqgen.com/wp-content/uploads/2026/01/SeqGen-Final-Cert_2026-2029.pdf)
- [SALES INQUIRY](https://seqgen.com/sales-inquiry/)
- [SERVICE REQUEST](http://seqgen.com/service-request/)
- [TESTIMONIALS](https://seqgen.com/testimonials/)
[](https://seqgen.com/)
- [SeqMo Rewards](https://seqgen.com/seqmo-rewards/)
- [HOME](https://seqgen.com/)
- [ABOUT US](https://seqgen.com/about-us/)
- [Our History](https://seqgen.com/about-us/our-history-2/)
- [Our Engineers](https://seqgen.com/about-us/our-engineers/)
- INSTRUMENT MODEL
- [LC/MS](https://seqgen.com/instrument-model/lc-ms/)
- [Sciex 3000 system](https://seqgen.com/instrument-model/lc-ms/api-3000/)
- [Sciex 3200 system](https://seqgen.com/instrument-model/lc-ms/api-3200/)
- [Sciex 4000 system](https://seqgen.com/instrument-model/lc-ms/api-4000/)
- [Sciex 4500 system](https://seqgen.com/instrument-model/lc-ms/api-4500/)
- [Sciex 5500 system](https://seqgen.com/instrument-model/lc-ms/api-5500/)
- [Sciex 6500 system](https://seqgen.com/instrument-model/lc-ms/api-6500/)
- [LC systems](https://seqgen.com/instrument-model/lc-ms/lc-systems/)
- [DNA Analyzer](https://seqgen.com/instrument-model/dna-analyzer/)
- [ABI 3100](https://seqgen.com/instrument-model/dna-analyzer/abi-3100/)
- [ABI 3130/3130XL](https://seqgen.com/instrument-model/dna-analyzer/abi-3130-3130xl/)
- [ABI 3500/3500XL](https://seqgen.com/instrument-model/dna-analyzer/abi-3500-3500xl/)
- [ABI 3730/3730XL](https://seqgen.com/instrument-model/dna-analyzer/abi-3730-3500xl/)
- [Real-Time PCR](https://seqgen.com/instrument-model/real-time-pcr/)
- [ABI 7300/7500](https://seqgen.com/instrument-model/real-time-pcr/abi-7300-7500/)
- [ABI 7900](https://seqgen.com/instrument-model/real-time-pcr/abi-7900/)
- [Thermal Cyclers](https://seqgen.com/instrument-model/thermal-cyclers/)
- [ABI 2720](https://seqgen.com/instrument-model/thermal-cyclers/abi-2720-2/)
- [ABI 9700](https://seqgen.com/instrument-model/thermal-cyclers/abi-9700/)
- [ABI 9800](https://seqgen.com/instrument-model/thermal-cyclers/abi-9800/)
- [Liquid Handler](https://seqgen.com/instrument-model/liquid-handler/)
- [Tecan Freedom Evo](https://seqgen.com/instrument-model/liquid-handler/tecan-freedom-evo/)
- [Microplate Reader](https://seqgen.com/instrument-model/microplate-reader/)
- [Coming Soon](https://seqgen.com/instrument-models/microplate-reader/)
- [SALES](https://seqgen.com/sales/)
- [SERVICE](https://seqgen.com/service/)
- [CONTACT](https://seqgen.com/contact/)
- [BLOG](https://blog.seqgen.com)
- [HOME](http://seqgen.com/)
- [ABOUT US](https://seqgen.com/about-us/)
- [Our History](https://seqgen.com/about-us/our-history-2/)
- [Our Engineers](https://seqgen.com/about-us/our-engineers/)
- INSTRUMENT MODEL
- [LC/MS](https://seqgen.com/instrument-model/lc-ms/)
- [Sciex 3000 system](https://seqgen.com/instrument-model/lc-ms/api-3000/)
- [Sciex 3200 system](https://seqgen.com/instrument-model/lc-ms/api-3200/)
- [Sciex 4000 system](https://seqgen.com/instrument-model/lc-ms/api-4000/)
- [Sciex 4500 system](https://seqgen.com/instrument-model/lc-ms/api-4500/)
- [Sciex 5500 system](https://seqgen.com/instrument-model/lc-ms/api-5500/)
- [Sciex 6500 system](https://seqgen.com/instrument-model/lc-ms/api-6500/)
- [DNA ANALYZER](https://seqgen.com/instrument-model/dna-analyzer/)
- [ABI 3100](https://seqgen.com/instrument-model/dna-analyzer/abi-3100/)
- [ABI 3130/3130XL](https://seqgen.com/instrument-model/dna-analyzer/abi-3130-3130xl/)
- [ABI 3500/3500XL](https://seqgen.com/instrument-model/dna-analyzer/abi-3500-3500xl/)
- [ABI 3730/3730XL](https://seqgen.com/instrument-model/dna-analyzer/abi-3730-3500xl/)
- [REAL-TIME PCR](https://seqgen.com/instrument-model/real-time-pcr/)
- [ABI 7300/7500](https://seqgen.com/instrument-model/real-time-pcr/abi-7300-7500/)
- [ABI 7900](https://seqgen.com/instrument-model/real-time-pcr/abi-7900/)
- [THERMAL CYCLERS](https://seqgen.com/instrument-model/thermal-cyclers/)
- [ABI 2720](https://seqgen.com/instrument-model/thermal-cyclers/abi-2720-2/)
- [ABI 9700](https://seqgen.com/instrument-model/thermal-cyclers/abi-9700/)
- [ABI 9800](https://seqgen.com/instrument-model/thermal-cyclers/abi-9800/)
- [LIQUID HANDLER](https://seqgen.com/instrument-model/liquid-handler/)
- [Tecan Freedom Evo](https://seqgen.com/instrument-model/liquid-handler/tecan-freedom-evo/)
- [SALES](https://seqgen.com/sales/)
- [SERVICE](https://seqgen.com/service/)
- [CONTACT](https://seqgen.com/contact/)
- [SERVICE REQUEST](https://seqgen.com/service-request/)
- [SALES INQUIRY](https://seqgen.com/sales-inquiry/)
- [BLOG](https://blog.seqgen.com/)
- [TESTIMONIALS](https://seqgen.com/testimonials/)
- [ISO 9001 CERTIFICATE](https://seqgen.com/wp-content/uploads/2026/01/SeqGen-Final-Cert_2026-2029.pdf)
# Troubleshooting Tecan EVOware Worktable: Resolving Vanished Labware
08 July 2026
[Tecan Freedom Evo](https://blog.seqgen.com/topic/tecan-freedom-evo)
[0](https://blog.seqgen.com/troubleshooting-tecan-evoware-worktable-resolving-vanished-labware#comments-listing)
## 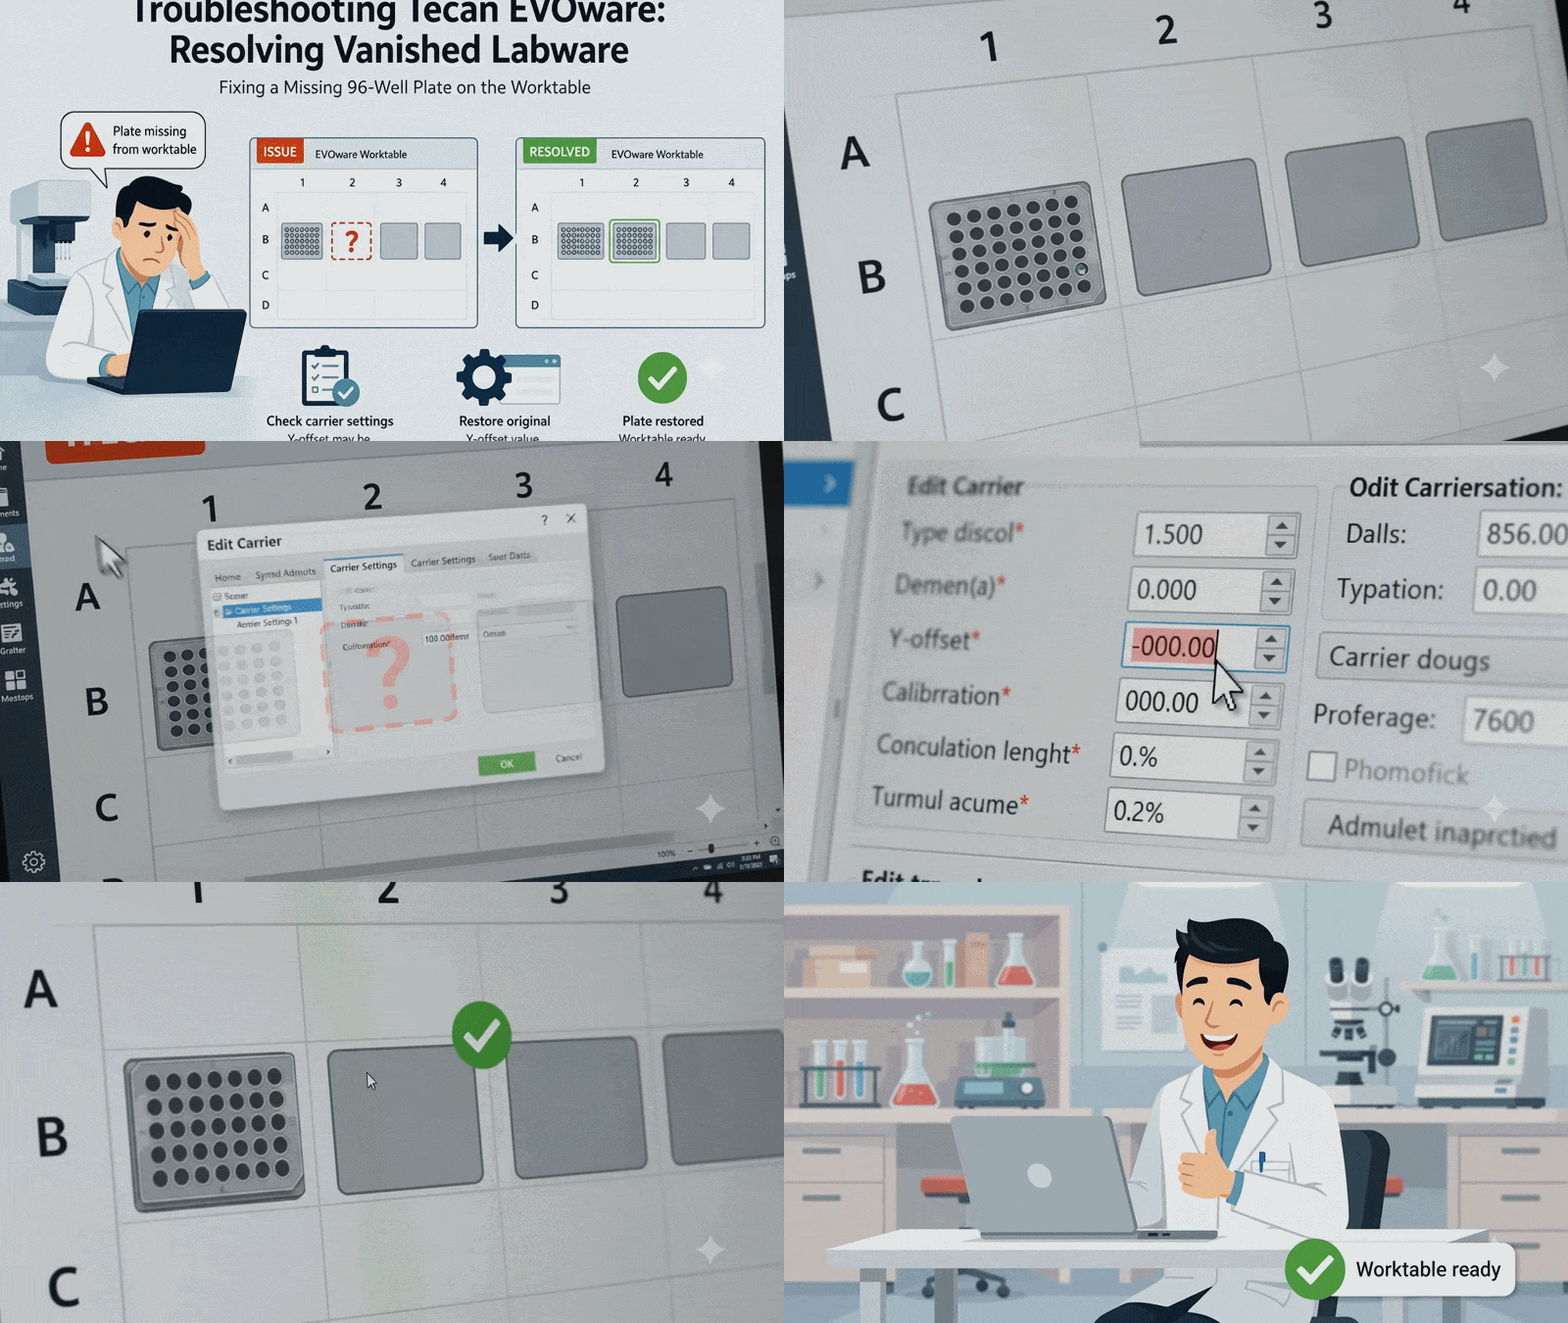
At a Glance: Quick Troubleshooting Summary
- **Instrument:** Tecan Freedom EVO 200.
- **Symptom:** A 96-well plate on the second carrier site disappears from the graphical worktable layout, and the view cannot be manually edited or restored.
- **Root Cause:** The Y-offset inside the "Edit carrier" settings was accidentally modified, shifting the labware's virtual coordinates entirely outside the viewable worktable grid.
- **Solution:** Open the carrier configuration menu and change the Y-offset for site #2 back to its original calibrated value.
When running liquid handling protocols, encountering an unexpected software glitch can immediately stall your lab's workflow. On automated instruments like the Tecan Freedom EVO 200, keeping a perfectly mapped digital worktable is essential for precise liquid transfers. A missing plate layout on your screen halts your protocol before the run can even begin.
Our team recently resolved an issue where a client's labware completely vanished from the software interface during a manual adjustment sequence. Below, we outline exactly why this worktable display error occurs and provide a clear walkthrough to restore your labware layout immediately.
- The Incident & Root Cause Analysis
- Step-by-Step Resolution Path
- Best Practices for Safe Alignment
- Quick Troubleshooting Reference Grid
- Contacting Our Support Team
## The Incident & Root Cause Analysis
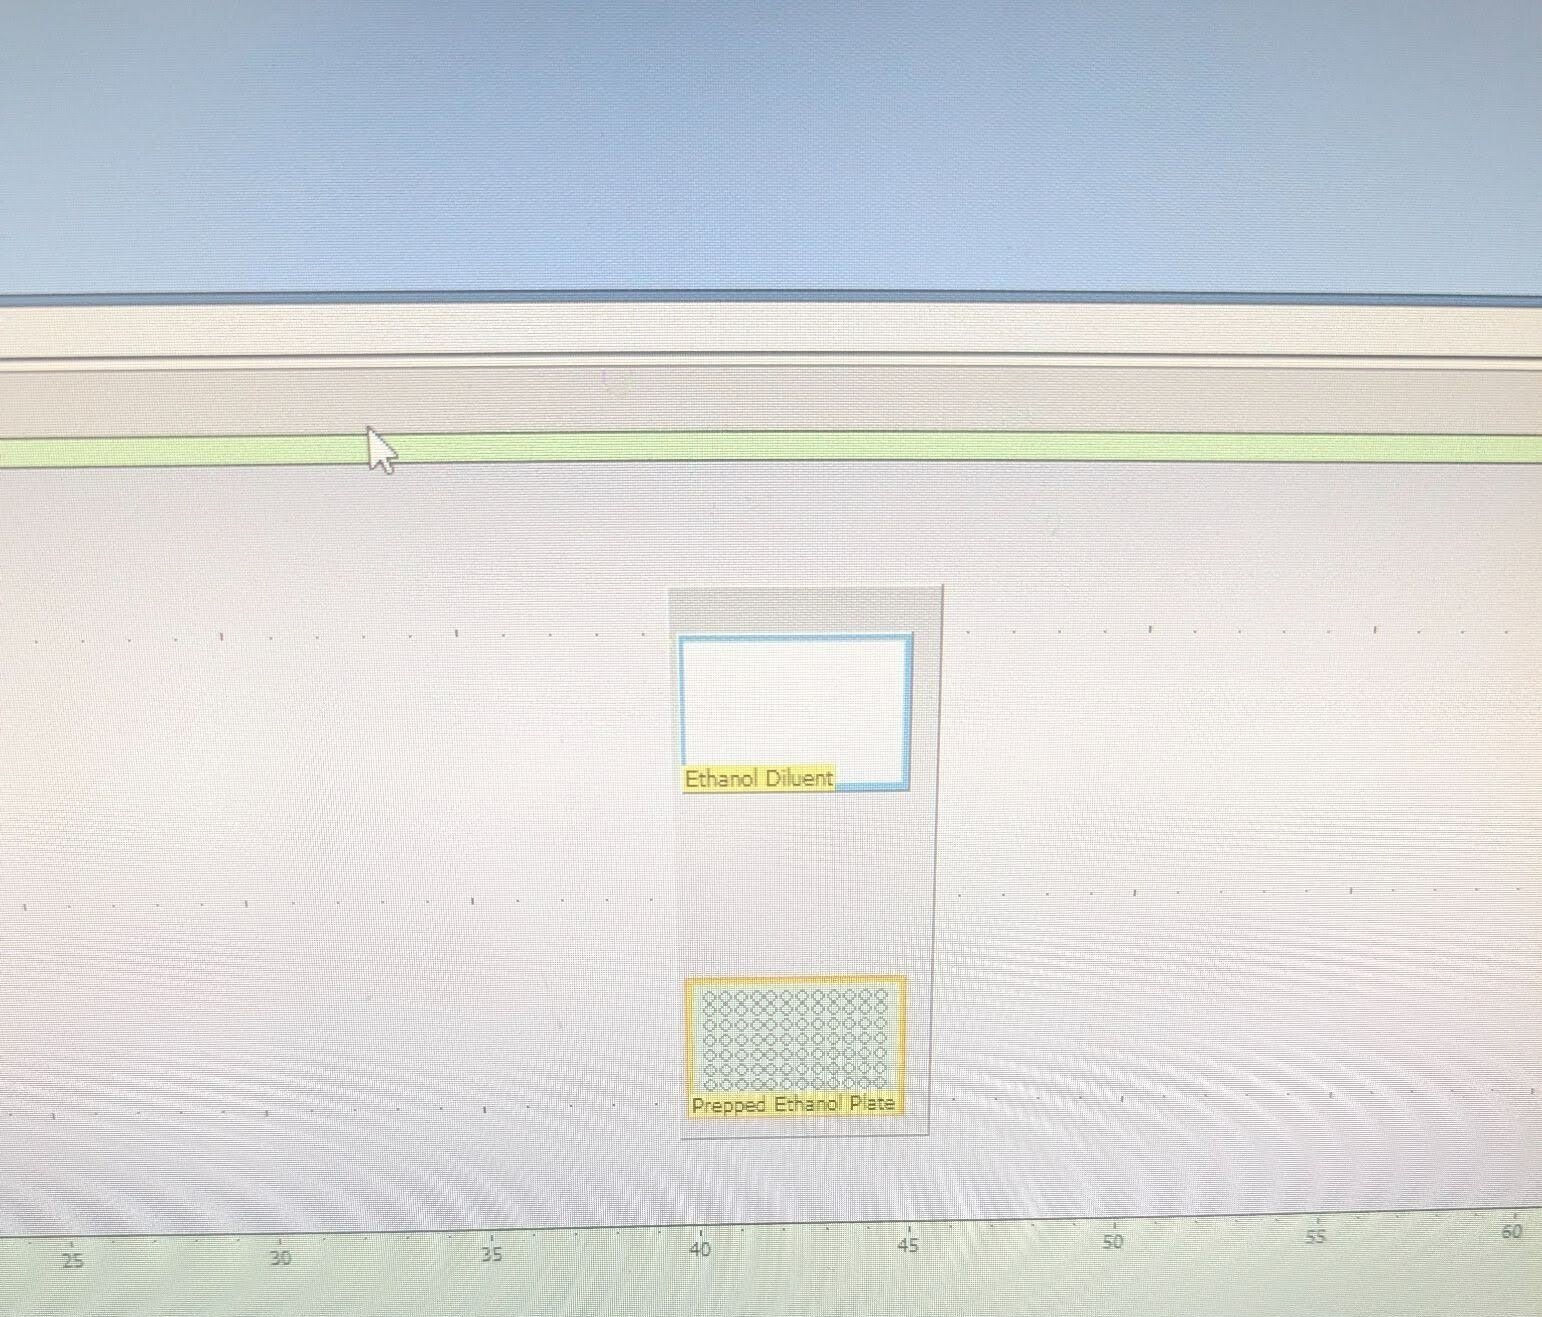
Our team was contacted regarding a "random" error that occurred while a client was trying to manually adjust the positioning of their Tecan LiHa arms with tips attached. During this process, a 96-well plate located on the second carrier site—which was designated for an aspiration step from plate 1 —suddenly disappeared from the EVOware layout screen. The client was locked out from re-adding the plate or editing the worktable grid to correct the view.
Our technical review of the worktable configuration showed that this was not an internal software bug, but rather an unintended coordinate override.
- **The Intention:** The client intended to adjust the physical tip positioning, a task that must be handled using the dedicated Labware Editor utility.
- **The Misstep:** Instead of opening the tool-specific parameters, they inadvertently accessed the "Edit carrier" configuration menu and modified the Y-offset for site #2.
- **The Result:** Changing this parameter calculated the plate's coordinates as being completely outside the valid, viewable boundaries of the worktable layout.
## Step-by-Step Resolution Path
If you encounter a missing labware layout on your screen, you can restore the view using our established resolution steps:
1. **Identify the Affected Site**
We first verified that the labware at carrier site #2 was the specific item missing from the graphical worktable display.
2. **Correct the Configuration**
We instructed our client to access the "Edit carrier" configuration menu, locate the options for site #2, and change the Y-offset parameter directly back to its original calibrated value.
3. **Verify the Layout View**
Once the original numerical coordinates were restored and saved, the 96-well plate successfully reappeared in its proper location on the worktable screen layout.
## Best Practices for Safe Alignment
To prevent future configuration corruption, script errors, or accidental hardware damage during manual setups, your lab team should strictly adhere to the following operational protocols:
| **Step** | **Protocol / Best Practice Description** |
| --- | --- |
| **Documentation** | Record all original numerical values and coordinates before making any changes to allow for an immediate reversal if needed. |
| **Incremental Adjustments** | Make small, single-axis changes at a time to safely observe the direct effect on alignment. |
| **Carrier Integrity** | Never change values in the "Edit carrier" window unless a specific site's RoMA gripping position varies significantly from the others. |
| **Tool-Specific Logic** | Position adjustments for LiHa tips or DiTi cones must always be performed within the Labware Editor, never change any value within the "Edit carrier" window. |
| **System Maintenance** | Ensure the instrument is properly initialized and completely flushed of bubbles before testing new scripts to avoid dripping or inaccurate aspiration. |
## Quick Troubleshooting Reference Grid
| **Symptom** | **Common Causes** | **Immediate Action** |
| --- | --- | --- |
| **Missing 96-well plate layout slot** | Accidental Y-offset modification within the carrier parameters. | Revert the Y-offset for site #2 back to its original calibrated value. |
| **Blocked from re-adding or editing labware views** | Labware positioned completely outside of valid worktable parameters. | Access the "Edit carrier" configuration to restore default coordinates. |
| **Layout or coordinate errors during arm setups** | Modifying base carrier properties instead of tool logic parameters. | Perform all tip and cone positioning changes strictly inside the Labware Editor. |
| **Liquid dripping or poor aspiration tracking** | Air bubble accumulation or failure to complete full initialization routines. | Run a system initialization and flush lines thoroughly to eliminate bubbles. |
## Contacting Our Support Team
If these layout steps do not resolve your software interface mapping error, or if you require expert assistance with full automated system calibrations, please contact our technical support team:
- Website: [seqgen.com](https://seqgen.com/)
- Service Requests: [seqgen.com/service-request/](https://seqgen.com/service-request/)
- Email Support: [service@seqgen.com](mailto:service@seqgen.com)
## Frequently Asked Questions (FAQs)
Q: Why did my plate suddenly disappear from the Tecan EVOware worktable layout?
A: A plate typically disappears from the graphical layout if the Y-offset coordinates are accidentally changed inside the "Edit carrier" menu. This calculation error shifts the labware's virtual coordinates completely outside of the valid, viewable boundaries of the worktable grid.
Q: How do I restore vanished labware in Tecan EVOware?
**A:** To restore a missing plate to your view, navigate to the "Edit carrier" configuration menu, locate the affected carrier site, and revert the Y-offset parameter directly back to its original calibrated default value.
Q: Where should I safely adjust LiHa tip positions in EVOware?
**A:** Manual position adjustments for LiHa tips or disposable tip (DiTi) cones must always be executed within the dedicated **Labware Editor** utility. You should never attempt to change tip alignment by modifying base values within the "Edit carrier" window.
Q: What causes layout and coordinate errors during Tecan arm setups?
**A:** Coordinate errors usually occur when an operator modifies base carrier properties (like X or Y offsets) instead of modifying tool-specific logic parameters. Always use the Labware Editor for physical tool adjustments to prevent labware from being pushed outside of the valid worktable parameters.
---
SeqGen specializes in the repair, maintenance, and refurbishment of essential laboratory instruments used in DNA sequencing and genetic research. Our expertise covers a wide range of equipment, including DNA sequencers like the [ABI 3730/3730XL](https://seqgen.com/instrument-model/dna-analyzer/abi-3730-3730xl/), [3500/3500XL](https://seqgen.com/instrument-model/dna-analyzer/abi-3500-3500xl/), SCIEX LC/MS mass spectrometers such as the [SCIEX 6500+](https://seqgen.com/instrument-model/lc-ms/api-6500/), [TECAN Freedom EVO](https://seqgen.com/instrument-model/liquid-handler/tecan-freedom-evo/) liquid handlers, real-time PCR systems, thermal cyclers, and microplate readers. With experience in both current and legacy models, SeqGen provides cost-effective solutions at significantly lower prices than leading competitors.
### Written by [Service Team](https://blog.seqgen.com/author/service-team)
Search this site on Google
Search Google
### Subscribe to Email Updates
## [](https://hubspot-cta-redirect-na2-prod.s3.amazonaws.com/cta/redirect/1939955/32eb2ce8-8e54-4e61-ad50-57f6b9b23d18)
### Recent Posts
### Posts by Topic
- [DNA Analyzer (49)](https://blog.seqgen.com/topic/dna-analyzer)
- [Others (42)](https://blog.seqgen.com/topic/others)
- [Crossword Puzzle (11)](https://blog.seqgen.com/topic/crossword-puzzle)
- [3730 Series Genetic Analyzer (10)](https://blog.seqgen.com/topic/3730-series-genetic-analyzer)
- [Tecan Freedom Evo (10)](https://blog.seqgen.com/topic/tecan-freedom-evo)
- [3500 Series Genetic Analyzer (6)](https://blog.seqgen.com/topic/3500-series-genetic-analyzer)
- [AI 101 (6)](https://blog.seqgen.com/topic/ai-101)
- [Archive (6)](https://blog.seqgen.com/topic/archive)
- [Events/News (6)](https://blog.seqgen.com/topic/events-news)
- [LC-MS (5)](https://blog.seqgen.com/topic/lc-ms)
- [Real-Time PCR (4)](https://blog.seqgen.com/topic/real-time-pcr)
- [3130 Series Genetic Analyzer (2)](https://blog.seqgen.com/topic/3130-series-genetic-analyzer)
see all
### Archives
- [September 2026 (1)](https://blog.seqgen.com/archive/2026/09)
- [August 2026 (1)](https://blog.seqgen.com/archive/2026/08)
- [July 2026 (1)](https://blog.seqgen.com/archive/2026/07)
- [June 2026 (2)](https://blog.seqgen.com/archive/2026/06)
- [March 2026 (2)](https://blog.seqgen.com/archive/2026/03)
- [February 2026 (2)](https://blog.seqgen.com/archive/2026/02)
- [January 2026 (4)](https://blog.seqgen.com/archive/2026/01)
- [December 2025 (3)](https://blog.seqgen.com/archive/2025/12)
- [November 2025 (1)](https://blog.seqgen.com/archive/2025/11)
- [October 2025 (4)](https://blog.seqgen.com/archive/2025/10)
- [September 2025 (5)](https://blog.seqgen.com/archive/2025/09)
- [August 2025 (1)](https://blog.seqgen.com/archive/2025/08)
- [July 2025 (1)](https://blog.seqgen.com/archive/2025/07)
- [June 2025 (2)](https://blog.seqgen.com/archive/2025/06)
- [May 2025 (1)](https://blog.seqgen.com/archive/2025/05)
- [April 2025 (2)](https://blog.seqgen.com/archive/2025/04)
- [March 2025 (2)](https://blog.seqgen.com/archive/2025/03)
- [February 2025 (2)](https://blog.seqgen.com/archive/2025/02)
- [July 2023 (1)](https://blog.seqgen.com/archive/2023/07)
- [May 2023 (1)](https://blog.seqgen.com/archive/2023/05)
- [April 2023 (2)](https://blog.seqgen.com/archive/2023/04)
- [March 2023 (3)](https://blog.seqgen.com/archive/2023/03)
- [October 2022 (1)](https://blog.seqgen.com/archive/2022/10)
- [September 2022 (1)](https://blog.seqgen.com/archive/2022/09)
- [May 2022 (1)](https://blog.seqgen.com/archive/2022/05)
- [February 2022 (3)](https://blog.seqgen.com/archive/2022/02)
- [February 2021 (1)](https://blog.seqgen.com/archive/2021/02)
- [March 2020 (2)](https://blog.seqgen.com/archive/2020/03)
- [December 2019 (1)](https://blog.seqgen.com/archive/2019/12)
- [November 2019 (1)](https://blog.seqgen.com/archive/2019/11)
- [September 2019 (1)](https://blog.seqgen.com/archive/2019/09)
- [June 2019 (1)](https://blog.seqgen.com/archive/2019/06)
- [August 2018 (1)](https://blog.seqgen.com/archive/2018/08)
- [May 2018 (1)](https://blog.seqgen.com/archive/2018/05)
- [April 2018 (1)](https://blog.seqgen.com/archive/2018/04)
- [March 2018 (1)](https://blog.seqgen.com/archive/2018/03)
- [January 2018 (1)](https://blog.seqgen.com/archive/2018/01)
- [December 2017 (1)](https://blog.seqgen.com/archive/2017/12)
- [November 2017 (1)](https://blog.seqgen.com/archive/2017/11)
- [October 2017 (1)](https://blog.seqgen.com/archive/2017/10)
- [September 2017 (1)](https://blog.seqgen.com/archive/2017/09)
- [August 2017 (2)](https://blog.seqgen.com/archive/2017/08)
- [July 2017 (2)](https://blog.seqgen.com/archive/2017/07)
- [June 2017 (2)](https://blog.seqgen.com/archive/2017/06)
- [May 2017 (5)](https://blog.seqgen.com/archive/2017/05)
- [April 2017 (1)](https://blog.seqgen.com/archive/2017/04)
- [March 2017 (5)](https://blog.seqgen.com/archive/2017/03)
- [February 2017 (4)](https://blog.seqgen.com/archive/2017/02)
- [January 2017 (4)](https://blog.seqgen.com/archive/2017/01)
- [December 2016 (3)](https://blog.seqgen.com/archive/2016/12)
- [November 2016 (3)](https://blog.seqgen.com/archive/2016/11)
- [October 2016 (4)](https://blog.seqgen.com/archive/2016/10)
- [September 2016 (3)](https://blog.seqgen.com/archive/2016/09)
- [August 2016 (5)](https://blog.seqgen.com/archive/2016/08)
- [July 2016 (3)](https://blog.seqgen.com/archive/2016/07)
- [June 2016 (3)](https://blog.seqgen.com/archive/2016/06)
- [May 2016 (4)](https://blog.seqgen.com/archive/2016/05)
- [April 2016 (4)](https://blog.seqgen.com/archive/2016/04)
- [March 2016 (4)](https://blog.seqgen.com/archive/2016/03)
- [February 2016 (30)](https://blog.seqgen.com/archive/2016/02)
see all
## Contact Us
#### SeqGen, Inc.
1725 Del Amo Blvd Torrance, CA 90501
#### +1 877 377 3743
#### +1 800 790 4830
#### [info@seqgen.com](mailto:%20info@seqgen.com)
#### Opening Hours
Monday - Friday: 8:30AM PST - 5:30PM PST
## Social Links
-
-
-
-
SeqGen is an independently owned and operated provider of repair services and refurbished laboratory equipment. Any product names, logos, brands, and other trademarks or images featured or referred to within the SeqGen website and/or on any social media forum are the property of their respective trademark holders or OEMs. These trademark holders are not affiliated with SeqGen or its website. These trademark holders do not sponsor or endorse SeqGen or any of its products or comments. The use of any trade name or trademark is for identification and reference purposes only and does not imply any association with the trademark holder of their product brand.
```json
{
"@context" : "https://schema.org",
"@type" : "BlogPosting",
"author" : {
"@type" : "Person",
"name" : "Service Team",
"url" : "https://blog.seqgen.com/author/service-team"
},
"dateModified" : "2026-10-16T01:57:51.663Z",
"datePublished" : "2026-07-08T13:00:00.000Z",
"headline" : "Troubleshooting Tecan EVOware Worktable: Resolving Vanished Labware",
"image" : [ "https://blog.seqgen.com/hubfs/tecan-worktable-troublehooting.gif" ],
"mainEntityOfPage" : {
"@id" : "https://blog.seqgen.com/troubleshooting-tecan-evoware-worktable-resolving-vanished-labware",
"@type" : "WebPage"
},
"publisher" : {
"@type" : "Organization",
"logo" : {
"@type" : "ImageObject",
"url" : "https://blog.seqgen.com/hubfs/SmallLogo-2.png"
},
"name" : "SeqGen, Inc."
}
}
```
```json
{
"@context" : "https://schema.org",
"@type" : "FAQPage",
"mainEntity" : [ {
"@type" : "Question",
"acceptedAnswer" : {
"@type" : "Answer",
"text" : "A plate typically disappears from the graphical layout if the Y-offset coordinates are accidentally changed inside the \"Edit carrier\" menu. This calculation error shifts the labware's virtual coordinates completely outside of the valid, viewable boundaries of the worktable grid."
},
"name" : "Why did my plate suddenly disappear from the Tecan EVOware worktable layout?"
}, {
"@type" : "Question",
"acceptedAnswer" : {
"@type" : "Answer",
"text" : "To restore a missing plate to your view, navigate to the \"Edit carrier\" configuration menu, locate the affected carrier site, and revert the Y-offset parameter directly back to its original calibrated default value."
},
"name" : "How do I restore vanished labware in Tecan EVOware?"
}, {
"@type" : "Question",
"acceptedAnswer" : {
"@type" : "Answer",
"text" : "Manual position adjustments for LiHa tips or disposable tip (DiTi) cones must always be executed within the dedicated Labware Editor utility. You should never attempt to change tip alignment by modifying base values within the \"Edit carrier\" window."
},
"name" : "Where should I safely adjust LiHa tip positions in EVOware?"
}, {
"@type" : "Question",
"acceptedAnswer" : {
"@type" : "Answer",
"text" : "Coordinate errors usually occur when an operator modifies base carrier properties instead of modifying tool-specific logic parameters. Always use the Labware Editor for physical tool adjustments to prevent labware from being pushed outside of the valid worktable parameters."
},
"name" : "What causes layout and coordinate errors during Tecan arm setups?"
} ]
}
```